UART
Reference:
Please refer to the Serial class from Arduino (http://arduino.cc/en/Reference/Serial).
Functions
- if (Serial)
- available()
- availableForWrite()
- begin()
- end()
- find()
- findUntil()
- flush()
- parseFloat()
- parseInt()
- peek()
- print()
- println()
- read()
- readBytes()
- readBytesUntil()
- readString()
- readStringUntil()
- setTimeout()
- write()
- serialEvent()
UART Rx and Tx pins are shared with GPIO 0 and 1. Thus, if you are using UART, please don’t call pinMode to change function mode of GPIO 0 and 1.
Currently, the supported baud rates are: 300, 600, 1200, 2400, 4800, 9600, 19200, 38400, 57600 and 115200 Hz.
Sample
Accept the typing from the terminal, then print out the input in the second line. Both read and write operations are via UART interfaces.
Setup
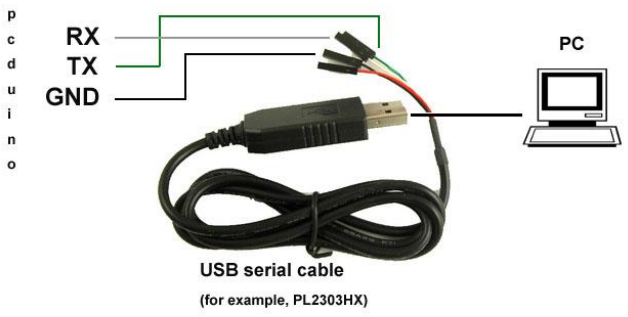
Plugin USB-to-serial cable to PC USB port and install usb_to_serial driver to PC.

Check the windows computer device manager for com port device.

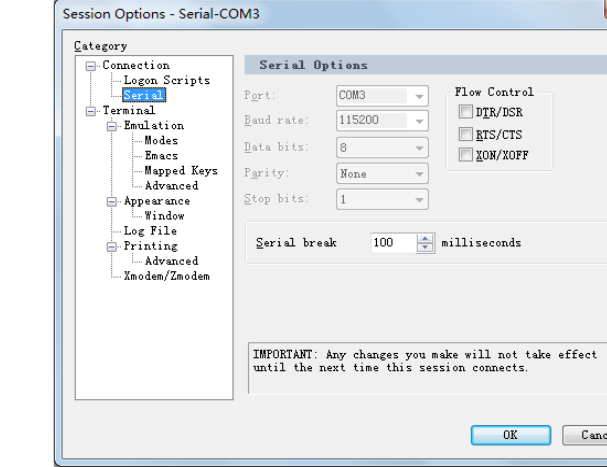
Run a terminal tool like sercureCRT or Putty, and configure the serial port parameters to 115200 8N1.

Then you can type on the terminal and see the output prints.
If you use Linux PC, you could use minicom tool for this sample.
Sample code
#include <core.h>
void setup() {
//Initialize serial with baudrate setting, the default config is SERIAL_8N1
  int rate = 115200;
  Serial.begin(rate);
  //you will see the string on the terminal
  Serial.println("Serial begin: ");
}

void loop() {
  //if you type the character in the terminal, available() will return the size you typed
  if (Serial.available() > 0) {
    // read the incoming byte:
    char thisByte = Serial.read();
    //print it on the terminal with DEC format
    Serial.print("I received: ");
    Serial.println(thisByte, DEC);
  }

  delay(200);
}